Sunday, August 2, 2015

Hi Ho! Hi Ho! It's Back to School We Go!

That is really my fake-it-til-you-make-it mentality for work. Don't get me wrong. I am always excited to go back to school, but it's only the beginning of August. I don't actually go back for a couple of more weeks. I would just like a little bit more downtime before the fast forward button is pressed. But, as we all know, the preparation starts long before the start of school. As an aside, I was thinking how funny it is when Thanksgiving, Christmas, and Spring Breaks all come, and 1-2 weeks seems like an eternity. Yet, when it's 1-2 weeks before the start of school, it feels like NOTHING! I guess that's relativity for you. Haha!

Anyway, as much or as little as we'd all like to think about it, it is time to think back-to-school. In fact, I know some of you are already there! I have done a little bit over the summer, but not nearly as much as I have the last few summers. Maybe it's because going into my fourth year of teaching as a seasoned veteran (bahahahaha), I am more guarded of that much-needed downtime.

My summer has been spent mostly focusing on my family. We had a 10-day vacation to see extended family in the New Orleans and Houston areas, and we coupled that with a few days on the beautiful white-sands beaches of the Emerald Coast in Florida. In between times, I have played tourist in my own city of San Antonio, visiting the Missions, seeing baseball games, touring museums, etc. It has been heavenly!

Now, I need to focus more on my classroom. I have another teaching assignment change this, although more minor than in year's past. I will still be fourth grade, but this year instead of being fully departmentalized, we will be teaming. I will be responsible for reading and writing, and my partner will teach math. We will both teach our own science and social studies. That itself is not much of a change since last year I was teaching writing and science/social studies. The biggest kicker is that my district is moving us to teaching reading by genre and pairing it with writing. Makes total sense! But, it is a change and something we all have to figure out. That has been my biggest challenge this summer... figuring out a structure for teaching reading by genre and gathering resources to do so.


Because I have been looking for resources, I am most grateful for the Teachers Pay Teachers site wide Back to School sale August 3-4!!!! I am also grateful to the Wise Guys for hosting a bomb-diggity linky party showcasing some awesome resources.

My Wish List is packed with resources, so I am ready to shop! If you are a TPTer, you know how awesome the sales are... most sellers put their stores on sale for 20% off, and TPT offers a Promo Code to get 10% more off, creating savings of up to 28%! So, fill up your Wish Lists and get ready to check out during the sale.

A word to the wise (and, unfortunately, I speak from experience here): don't forget to enter 
BTS15 
at checkout. Doh! How could I have done that?!?!

Need some ideas of what to shop for? For me, back-to-school is about setting the tone for year and making sure all the procedures are in place for each subject. Check out my Writing Workshop Teacher Toolbox for all the basic forms you need to get started in Writing Workshop. Included are Mentor Text Chart, Baseline Sample Analysis Form, What Are We Working On Form, I'm Ready for a Conference sign-up sheet, Conferencing Form, and Comments from the Reader slips.
Going along those lines of being prepared, make sure you have your Emergency Sub Plans for those unexpected days you have to be out. My emergency sub plans have been by-far my best-seller and have gotten lots of positive feedback from buyers.

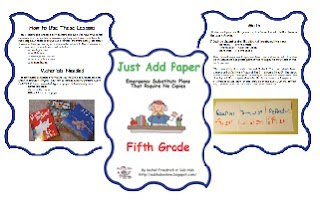
I have two types: The Just Add Paper plans that little to no prep...just have a grade-appropriate picture book and paper available for your sub. These are in my store for grades K-5 and will save you added stress of needing something quick and easy to leave for your sub.

And I have the CCSS-aligned plans. These need slightly more prep. They are based on a specific picture book and come with ideas and printables for a day's worth of teaching. They are available for grades K-4.


Tuesday, November 18, 2014

Writing Kiosks Unveiled

I am having such conflicted feelings this week. First, holy bagumba! (Have you read Flora and Ulysses by Kate DiCamillo? If not, do it!) I can't believe it's already almost Thanksgiving Break! And second, holy bagumba! Why isn't it Thanksgiving Break already?! Ha! Seriously, though. I really do need a break. It has been a fantastically and amazingly challenging year so far. So many things are going well, and yet, so many things are extra difficult. I guess that's the way it goes.

This week I had one of the successful experiences, so I thought I would share. I have posted about the idea of writing kiosks before, but this is a post about my actual kiosks and how I use them. Now, they are nothing pretty, but I can tell you that all 60 of my students find them engaging.

Here is what they look like:


They are made from tri-fold presentation boards cut into thirds. The side pockets are just card stock taped on the edges with clear packing tape. In the middle goes the title and reference material. In the side pockets are various ways to practice the targeted skill. I use materials I either make myself or find from the awesome teachers on Teachers Pay Teachers. I use everything from task cards to photos to the students' own writing in the practice.

First of all, there has been direct instruction in the form of mini-lessons on every topic. Writing kiosks are NOT for teaching new material. They are for practicing targeted skills, because we all know that practice makes perfect...or at least better writers.

As I unveiled the kiosks to the sounds of oohs and ahhs (seriously, you'd have thought fireworks were going off in the classroom), I made sure to set clear expectations. I had already put students into groups of 2-4 and assigned them a starting kiosk. My set of expectations looks something like this:

1. Stay in your assigned kiosk.
2. Complete the activity at your kiosk.
3. Voice level at a 1 or 2.
4. If you finish the activity early, work on your own writing.
5. Turn in your kiosk work to your class tray.

I went over the expectations, told the students their starting kiosk, and was ready to monitor and redirect like crazy. But something pretty amazing happened. It was nearly silent. EVERY student (and I do mean every student...even that really reluctant one) was in their assigned kiosk and working intently on an activity. There were a few questions here and there, but lots of excellent practice was happening. The activities I have included in these are designed to take about 20 minutes to complete, so we did 20 minute rotations.

Now, the students are asking to do them again and again. We will be doing kiosk this whole week so everyone can get to all the kiosks. But they will certainly make additional appearances throughout the rest of the year. I will change up topics and activities as needed, but I do believe we have discovered a successful strategy! And for that, I am truly thankful.

Thursday, August 7, 2014

Creating an Author's Chair Students Will Want to Sit On

Author's Chair is such an important part of Writing Workshop, and it is a part that I always find myself skipping for time purposes. Well, I am vowing to turn over a new leaf this year! And to help me stick to my guns, I created a new Author's Chair for my classroom.


It was so much fun to research and make... and I think it will be just as fun to use... for both me and my students.

First, I started with an old stool that my children had stained from their artistic endeavors. But any stool will do. This one is wooden, but I am sure with a different type of paint, you could probably even use a metal one. I also gathered my supplies. I used craft paint from Michael's because it was so much cheaper, and it didn't take much (there is still some left in the bottle), but you could also use paint from a home improvement store. I needed Mod Podge, some ribbon, paint pens, and a fine-grade sandpaper.


I lightly sanded the stool, wiped it down, and then started the coats of paint. I put on three coats to get it the color I wanted with no streaks.


Once all that was dry, I could Mod Podge the top. I created the Author's Chair sign on the computer, printed it out, and carefully cut it out. The words on the stool, I wrote in paint pen. Then I just followed the directions on the Mod Podge bottle for application. I ended up putting 10 coats of Mod Podge on the top and around the rim of the stool. 


All the words are quotes about writing from authors. I chose to do them in different colors and write them around the top, down the legs, and on the rungs. These are the quotes I used:


"Make the words yours. If your eyes could speak, what would they say?" ~The Book Thief by Marcus Zusak

"Writing is seeing. It is paying attention." ~Kate DiCamillo

"Write it so that people can hear it, and it slides through the brain and goes straight to the heart." ~Maya Angelou

"I can shake off everything. As I write, my sorrows disappear, my courage is reborn." ~Anne Frank

"Look in your heart and write." ~Unknown

"We all have a story to tell." ~Unknown

"Writing is the painting of the voice." ~Voltaire

"Writing is easy. All you have to do is cross out the wrong words." ~Mark Twain

"It doesn't really matter what you write, but you must keep up practice." ~Rick Riordan

"There’s always room for a story that can transport people to another place." ~J.K. Rowling

"I like to think of myself as a storyteller." ~Kate DiCamillo

"READ! READ! READ! and WRITE! WRITE! WRITE!" ~Jack Prelutsky

"The storyteller in me asks: what if? And when I try to answer that, a story begins." ~Jane Yolen

And the final Author's Chair looks like this. I am pretty pleased with how it turned out.


Moving on to what the Author's Chair will be used for, I created a freebie with some Response Stems.  I find that students never know quite how to respond to what is shared from the Author's Chair, so I created these that will become an anchor chart in my classroom and be glued in their writer's notebooks as a guide to help scaffold their learning. You can find the link to my Author's Chair Response Stems here.


Sunday, August 3, 2014

Back to School Sale Time!

My wish list has been loaded for a while. And now I am ready to stock up on the Teachers Pay Teachers Products I need for the school year (or at least the beginning of the school year). The TpT Annual Back to School Sale is always one of the biggest of the year. Most sellers, including nearly all of the top sellers, participate by putting their whole stores on sale 20% off. And then on top of that, TpT allows you to enter the code BTS14 at checkout to get an additional 10% off... which adds up to 28% off on so many fantastic teaching products.

Some of you may already know that I got my start in blogging with Sub Hub. I had an extremely hard time finding a full-time teaching position, and so subbed in K-5 classrooms for four years. In those years, I learned a lot about what teachers and subs need, so I launched several lines of sub plans. And even though I don't really post on Sub Hub anymore since getting my full-time fourth grade position, those sub plans continue to be by far my most popular products.

First, there is the line I have of emergency sub plans aligned with CCSS. All these plans are based on a picture book and have lessons for warm-up, reading, language arts, math, science, and social studies. They are available for grades K-4.


Then, there is the Just Add Paper line. These are for those true emergencies. Then also have lessons for warm-up, reading, language arts, math, science, and social studies. They are also based on picture books. And they are available for grade K-5 and as a bundle for subs to have in case no plans are provided. The difference with these is that they are much more generic. You get to pick the picture book you use, so it can be anything you have available in your classroom. And there are no copies to make at all. You just need to add paper. There are lessons to write, draw graphic organizers, make foldables, and make other manipulatives. They are not meant to be comprehensive or in-depth lessons. They are meant to make the most out of a bad situation... when you are not physically able to write any sort of a lesson plan. These plans will let you salvage something out of the day, and at least do some educational activities.


Both these lines, along with everything else in my store will be on sale Monday and Tuesday (August 4-5). You can see lots of other stores and products on sale by visiting this Pinterest board I am hosting specifically for the sale.


Or visit these linky parties to find other amazing resources. What did teachers ever do before Teachers Pay Teachers? Ha! I know I have been a tremendously better teacher because of the products available on TpT.


So, happy shopping, and make this the best school year yet!


Thursday, July 31, 2014

Let's Have Some Fun Linky

The start of the year can be a scary time for most teachers, me included. There are so many details to remember. And so many things to be unpacked. And so much organization. And then there's all the inservice meetings. Whoa! I might be hyperventilating a little. Time to slow down and remember why we do this teaching thing in the first place.

For me, the number one reason I love to teach is that it is FUN! There is not a day that goes by that those little stinkers don't make me smile and laugh. This is why I am linking with Elementary Matters in her Let's Have Some Fun link party.


First, I have to share a funny story. Well, I have so many, it's hard to choose. One that stands out the most is from when I was a substitute. On this day I was subbing in a a fifth grade room. I arrived at the classroom a little early, but there was already a student sitting dutifully in the hallway where she was supposed to wait. I politely smiled at her, said good morning, and went in to prepare.

I was reading through the lesson plans when I heard through the closed door. "We have a really weird sub today! I mean...really weird! She smiles A LOT!"

Well, of course I couldn't let this golden opportunity pass by without a little razzing. I opened the door and gave her my best "sub look" while I said, "Weird sub, huh?" And then I closed the door.

It was quiet for a minute, and then I hear, "Be careful what you think! This sub reads minds!"

Bahahahahaha!!!! Oh, the innocence and naiveté of sweet little fifth graders.


And now for my fun lesson. It involves my Monthly Writing Packets. I have them for the first few months of school, and hope to have the rest of the school year finished soon. These packets include interesting journal prompts, fun writing prompts that you can take to publishing, writing picture prompts, and even a literature-based writing activity.


For the August packet, the literature-based writing activity comes from one of my favorite books to read at the beginning of the year, Do Unto Otters by Laurie Keller.

Writing is fun when we make it so! And this and all my other resources are on sale for the big Teachers Pay Teachers Back to School sale Aug. 4-5. My store will be 20% off, and you can enter BTS14 at checkout to get additional savings. Check it out!


Thursday, July 10, 2014

So Many Anchor Charts, So Little Space


Especially when the fire marshall tells you such a small percentage of your walls can be covered in paper. I have gone back and forth with what to do with the anchor charts I produce with my class. After a while, I swear they start to mate and multiply. How do you end up with so many? And how can students continue to take advantage of those resources you worked so hard to make?

I have seen and heard some pretty brilliant ideas on Pinterest and from other teachers. Ideas such as hanging them from chart stands or clothes racks so students can flip through, taking photos of them them and putting them in binders, or hanging them on rings from the wall. I need a way to have them accessible without having them on the wall (to make Mr. Fire Marshall happy). Plus, taking up as little space as possible is always a plus.

So, this is the idea I am going to try this year: THINK SMALL! I know, it's not what is usually said. But, I have decided to think outside the box of anchor charts. Who says they have to be made on giant chart paper? Are the anchor chart gods going to smite me if I go small?

Instead of creating them on chart paper and trying to figure out what to do with it, I am going to go small and utilize technology. I will create those charts on plain 8 1/2 x 11 paper, projecting it as I create it using my Elmo. Now, I can even use different colors or patterns of paper. Oh my! The creative possibilities are endless! Of course, this only works if you have access to a document camera, which I do. If you don't have one, you might want to look into grants or other possibilities to get one. Mine has become an invaluable teaching tool in my classroom.


Now, I will have created an anchor chart just the right size to slip into a sheet protector in a binder. I can organize them into different binders, or use dividers in one binder. I can even make black and white  copies of each anchor chart to put in the same sheet protector in case multiple student need to reference the same anchor chart at once.

This year, I will be teaching three sections of fourth grade writing, plus one science/social studies, so most of my anchor charts will be writing. I plan to break them down into binders based on lesson topic, such as Writing Ideas, Grammar/Spelling, Revising Strategies, Prewriting Strategies, Editing Techniques, and Beginnings/Endings. I plan to keep the binders on a shelf alongside the mentor texts we use for each genre as well as dictionaries, thesauruses, and rhyming dictionaries. Then all the writing reference material will be in one spot.

A spin-off idea might be copying, shrinking, and laminating the charts. Then using binder rings to make a set for each table group. That would take a lot more work though. I think I will start with the create-through-projection-to-organized-binder idea, and direct students to the binders when they need resources.

Sunday, July 6, 2014

DIY: Make a Cool Book Setting Sign for Your Classroom

I have been inspired by signs like this for several years and vowed to have one in my classroom.


Finally, I made my own... and one that would work with the beach theme in my classroom. Want to know how?

First, I set out to brainstorm the locations I wanted on my sign. I scoured Pinterest and then Googled until I could Google no more. I also sought out the help of my friends through Facebook. And when I got stuck, I thought of my and my students' favorite books, and if they were set in identifiable places.

Next, I went about trying to figure out what materials to use. To go with my beach theme, a pole was pretty easy. I immediately thought of bamboo, which was easy to find in the gardening section at Lowe's. But what would the signs be made of? My inspiration pictures, and actual signs like this, are made from driftwood or broken pieces of wood. That's not so easy to find, at least where I live. Finally, after walking around Lowe's for a while, I came upon shims. If you don't know (and I didn't), shims are pieces of tapered wood that carpenters use to fill in gaps or make pieces level. Anyway, they were cheap, so I thought I would try to work with them. But, I hated that they were just a light wood color. I wanted them to look weathered... like driftwood. I thought, it's wood, so why not stain? And lo and behold, there is a stain that is driftwood colored! I was all set. All the materials cost me less than $20.


My first step of actually making the sign was to stain the shims. This was a very quick and easy process. I just rubbed the stain on both sides with a cloth. Just make sure to work in a ventilated area. It took them a couple of hours to dry.


Next, I gathered up some colors of acrylic paints I just had, but you could use any sort of thick, colored paint. I would not imagine watercolors would at all. I got my children to help me paint, choosing a variety of colors and printing styles so that they looked mismatched. They took an hour or so to dry.


Finally, I nailed them to the bamboo using small finishing nails. I made sure to mount them all caddywampus (one of my favorite words) to make it look more like the inspiration. Just a word to the wise: if you do use bamboo, it is VERY difficult to nail into. That was the hardest part of the process for me. But, TA DA!!!!! I now have a totally cute sign to put in my classroom. My hope is that the students ask about settings they don't know, and that might lead them to other books to love.